Wednesday, November 24, 2010

Blue and Silvers


I'm currently on a blue and silver kick.
My first card today is one borne of trying to make the second card. I saw a similiar second card in the current issue of Take Ten magazine and wanted to make it. I thought the Cuttlebug ornament would be perfect for it, but it was too large. So not wanting to waste mirror paper, I created the first card.
The first card is 4 1/4 X 5 1/2 with a white cs base. I then used a 4 x 5 1/4 piece of blue shimmer paper. I then cut out a piece of silver mirror card stock. Over it I cut with a nestie a piece of white card stock. I then popped up the ornament a tied a piece a ribbon at the top of the ornament. Inside the card, I stamped "May your days be Merry and Bright" which is a stamp from Hero Arts.
As I said the second card is an idea I got from the current Take Ten magazine. I used a piece of grey core coordiantions card stock an ran it through a Cuttlebug embossing folder that has lots of ornaments on it. I then cut that card stock into strips and attached them to the base white cs. I used a Prickley Pear stamp for the ornament and stamped it with Versamark and then used Ranger Silver Tinsel embossing powder on it. I then adhered it to a piece of silver shimmer card stock. I added little gemstones on the card and stamped the same saying from Hero Arts.
For the third card, a friend of mine needed a Hanukkak card for next week. I saw a similar design at Archiver's, but I changed my card into an easel card. All stamps are from Northwoods. The small Stars of David were stamped in Royal Blue Versacolor ink. The large Star of David was stamped with Versamark and I used Silver Tinsel embossing powder on it and the saying "Happy Hanukkak".
I wish all my friends and family a happy Thanksgiving. I'm truly blessed to know all of you.


Friday, November 19, 2010

Last minute prep for craft show on Saturday


I didn't get to make many cards yesterday as I had an appointment for a CT Scan yesterday morning at 10. I had to get to Shawnee Mission Medical Center to drink some nasty tasting concoction at 8 a.m. Luckily it wasn't that bad tasting and they did give me 90 minutes to drink 32 oz. of the stuff. I still had to have a IV put in my hand so that the test could be done with contract and without contrast. So I didn't get away from the hospital until almost 10:30 a.m.

I also got a call from my OB-GYN who ordered the CT Scan that my quarterly pap was clear. It's now been 18 1/2 months since my hysterecomy due to Uterian cancer. With God's grace the scan results will also be clear too.

After that I headed over to Street Car Named Desire to join current and other retired employees from Blue Cross for lunch. It's always to good to visit with my BCBSKC family and I love getting with them on a monthly basis.

Today is going to be hectic as I complete cutting out paper for two make n' takes that I will have my booth at St. Patrick's Catholic Church parish hall tomorrow from 9 to 4. I also have to make a total of five cards for an item to be donated to an auction to raise funds for their school.

The card above will be one of the make n' takes at the craft fair. I'll have one more and if I can time later today, I'll post it. The make n' takes will be $2.00 each and will include an envelope.

The card is a 4 1/4 X 5 1/2 white cs base. I then layered a 4 X 5 1/4 red cs from Stampin Up (red riding hood). The green Christmas tree paper is from K & Company and it's deminisons are 3 3/4 X 5. All the stamped images are from Our Craft Lounge. They were stamped in Memento Tuxedo Black ink and colored with Copics.

Have a blessed day everyone!

Thursday, November 18, 2010

Riley's first Thanksgiving


Yesterday, I attended a quick card class at Stamper's Ink. They had a teepee card made with Native American Riley. However, I needed another Thanksgiving card so I brought the makings of that card home with me and created the above card.

Both Riley images were stamped using Memento Tuxedo Black ink and colored with Copics. The Happy Thanksgiving image is from Our Daily Bread. Oval Nestabilities were used to cut out the shapes for the Riley images and a corner rounder was used on the papers with "Happy Thanksgiving". The black and yellow cardstock triangles were embossed with CB folder Swiss Dots. The dotted red paper and the plain red is the front and back of some Bo Bunny cs.

I'm looking forward to later today as I'm heading back by Stamper's Ink as today is the new "Holiday" release for Riley. I've seen some really cute cards on the Riley online site and on Splitcoast where the design team has been busy using the new images.

Have a blessed day!

Tuesday, November 16, 2010

Card for Liz's mother


Several of you know my best friend Liz. Her 86 year old mother fell at her retirment home on Sunday and broke her ankle. It took three hours of surgery at NKC hospital on Monday to repair her shattered ankle. Her mother is looking at six long weeks of rehab. We're asking for prayers for Liz's mother and her family as they go through this crisis.

I made the above card for her just a few minutes ago. It's a stamp that I bought Friday evening at Stamper's Ink. It was in LouAnn Hale's trunk show (stamp n plus)...even though there wasn't any iris folding on the card.

I used a 4 1/4 x 5 1/2 white card stock base. the patterned paper is from K & Company. The silver paper is some that I had in my stash. I added some glitter domes in the upper right hand corner.

Indian Corn Thanksgiving


The stamp used on this card is from Just Rite Stampers. I used Memento Rich Cocoa to stamp the image and used Copics to color the image. The base card is white cs. The embossed brown paper and the flocked pumpkin paper are from a paper pack from a company called GCD. Happy Thanksgiving was stamped inside the card. I added Stardust stickles to the bow on the stamped image.

Thanksgiving card from Stampendous


I fell in love with this stamp from Stampendous and had to make this as a Thanksgiving card. I stamped the image using Memento Rich Cocoa. I used Copics to color the image. The solid CS are Bazzil cs. The polka dot paper which I used a Nestability to create the pumpkins, is from Bo Bunny. Happy Thanksgiving was stamped on the inside of the card. The glittered leaf brads were bought at Hobby Lobby.


Iris folding - Blue


Of the three Iris Folding classes taught this past weekend at Stamper's Ink, I believe these three card were my favorites...of course I'm partial to Blue!

Iris Folding - Brown


This picture are of the cards that we did in the third Iris Folding class this weekend at Stamper's Ink taught by LouAnn Hale.


The card with the maple leaf was changed as I needed a Thanksgiving card so I substituted Pilgram Riley for Raking leaves Riley.

Monday, November 15, 2010


I bought the new issue of Card Creations magazine yesterday. I found two designs that I really liked and as usual, found a way to make them my own.

The candle card is a Cuttlebug embossing folder. I used yellow Stickles on the candle flames and added a bronze rhinestone on some of the candles. I used red ribbon that I purchased at JoAnn's yesterday. I also purchased the tag that is on the card, but I did stamp the "Wish Big" on the tag. That sentiment is from a birthday set from Friskars.

The other card in this post was so simple. I used some silver DMC floss to make the "utility lines". I used a Heartland Creations Nestability to cut the cardinal shape. I added a black gemstone for the cardinal eye. I also added three heart shaped gemstones to the left hand side of the card. The stamped image "A little birdie told me" is from a Hero Arts set. I put inside the card another stamped image from that same set that says "you're special".

Both cards are 4 1/4 by 5 1/2. The green base card stock in the candle card is from Hero Hues collection. The white cs on both cards are from my stash of white cards stock.

Have a blessed day!

Betsy Bluebell Christmas


On Friday, I bought the winter issue of the Magnolia magazine. I fell in love with a card design in that magazine, but I didn't have the "Tilda" stamp that was used. I knew I had a Betsy Bluebell stamp that was similiar so I made this card.

I used a 5 1/2 x 5 1/2 inch brown card base. The designer paper is from BoBunny. I think the ribbon was from Doodlebug. I used the small Fleur De Lis Shapeability by Spellfinders and cut two of those shapes. I then cut them in half and pop them up in each corner and added a pearl.

I made the tag and stamped "Merry Christmas". That stamp company is unknown. I added three gemstones from Hero Arts to the tag.


The individuals who have their works published in the Magnolia magazine are definitely artists. I only hope to be blessed by copying some their designs or to be inspired to tweak their designs in some way to make the design unique to me.
Have a blessed day!

Iris Folding


It was a fun weekend of card making. On Friday evening I took a class at Stamper's Ink in Iris Folding. I also attended two more classes on Saturday in this techniques. I'm sure others that attended all three classes like me are no longer intimidated by this technique.


This first picture are the cards from Friday night. Everything we did was in red. The shadows on the red dress card are from the roses. I didn't realize that I had popped them up so much with the 3D dots I used, that they casted a shadow when I took the picture.


Pictures from Saturday's classes will be coming as I have a card from each class to finish up. The iris folding was completed; however, I still have finishing touches to put on one card from each class.

Wednesday, November 10, 2010


Aren't the above cards beautiful? These four cards were in this morning's inside/outside card class at Stamper's Ink.
It's not often anymore I learn a new technique at a class, but I did with the "Give Thanks" card. I've never used a product called Perfect Pearls. We stamped the leaves with versamark and then using a make-up brush we circled the different colors of perfect pearls onto the leaves and then bonded the ink to the paper with hairspray. I think I'll have to replicate that card for my Thanksgiving cards.
The picture of the green card here does not do that card justice. It was a lot of work, but the results are so beautiful. I'm going to have to play around with that one too as I have so many stamps that would look cool in the middle of that Nestie die cut. Whatever I decide to do, it will have to elegant as shimmer paper almost demands something elegant.
Have a blessed evening everyone.

Tuesday, November 9, 2010

Mojo and Sanata Card


I came up with this idea a little while ago for the Santa card. Mojo was on top of my patio table soaking up the sun and I decided to include him in the picture. It's hard to believe it's in the 70's on November 9th, but Mojo is definitely taking advantage of the nice weather.
The card base is white cs with a piece of 5 1/4 by 4 piece of Red Riding Hood SU paper. To the red cs I've added a belt sticker from Stampendous. I stamped in black the word Believe below the belt buckle. The Santa image is from Stampin Up. I colored Santa's face with E00 and E02 Copics. Santa's hat was colored with R35 and R37 copic markers. I then add red Sparkly fluff to the hat and white Sparkly fluff to Santa's hat.


The above cute cards are from a kit I bought at Scrapbook Page last week. These designs are by Julie Case who teaches Copic coloring classes at the "Page". Since I didn't attend the August class, I had to improvise on some of the cards as I didn't have the exact same stamps or punches. "Just floating by to say Hi" and "Bee happy" are two of my stamps that I used.
On the "Sending you a cup of love card", I didn't have a heart border punch so I used one of my bordabilities and added dew drops.
These five cards will be for sale at the St. Patrick's Catholic parish craft sale on Saturday, November 20th from 9 to 4. Lots more cards to make so I go to make more.
Have a blessed day!

Monday, November 8, 2010


Yesterday I posted a baby boy card for my niece Amber who should be having her 2nd child any day now. Of course I had to reproduce that baby boy card for the craft show that I'm going to be at later this month. So then I had to make a little girl card. I had bought this baby Tilda stamp last week. As I rummaged through my papers I discovered I didn't have any paper appropriate for a baby girl. Darn that means I had to make a shopping trip to JoAnn's. I found the above paper in a pack of paper from DCWV called Nana's nursery.
The base card is 5 1/2 x 5 1/2 and is white cs. I then added a 5 1/4 x 5 1/4 piece of brown card stock and then started layering the papers. Tilda is stamped in Memento Rich Cocoa ink and colored with Copics. I added white Sparkly Fluff to the wings.
Hopefully someone who will be at the craft show on November 20th at St. Patrick's will want to purchase this sweet baby girl card!

Sunday, November 7, 2010

Baby card


My niece Amber is due almost any day now with her second little boy. I've got to get her gift mailed and I made this cute little card for her and her new little one. The stamp image is from Stamp Oasis. It's a stamp that I purchased in Las Vegas at the Rubber Stamp Expo. I stamped the image using Memento ink and then colored the image with Copic markers. For the horse's mane, I used Dark brown flocking to add texture to the image.
Amber this card and two cute little outfits will be sent to you tomorrow. Just have to get myself up to the post office tomorrow to mail them. At least there's nothing else on my agenda tomorrow. Love ya!

Such a simple card

I know some of you have been to my house and you know I buy every card magazine that comes out. Paper Crafts Magazine has a similiar card in the current issue. I found this lovely ribbon in my stash. I also found the "Have a Holly Jolly Christmas" stamp on a clear set by Recollections that I found at Michaels. I used the Provocraft Cuttlebug Holly folder to emboss the silver shimmer cs. I used silver embossing power on the Holly Jolly image. This card is so simple and fast. It will be one that will definitely be for sale for $2.00 at the craft show on November 20th.

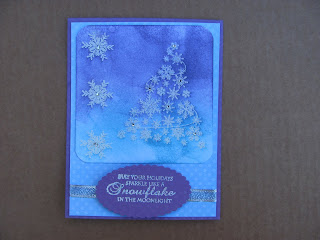
Snowflakes in the moonlight.


The stamps used are from Our Craft Lounge. I stamped the snowflakes and tree images using Versamark Ink and then used Snowflake embossing powder from Ranger. I then used Dusty Concord Distress Ink and Broken China Distress Ink and sponged it around the trees and the snow flakes. This color combination of purple and blue was found in an Australian card making magazine that I purchased this week from Stamper's Ink. The purple and blue papers are the polka dot papers from Bo Bunny.

Heartfelt Creations Faith is


One of my favorite stamp companies is Heartfelt Creations. I first discovered Heartfelt Creations at the Las Vegas Rubber Stamp and Scrapbook expo in 2007. I purposely seek them out at any show where they may be present and their designers are excellent. I had the pleasure of working their booth at a show in Independence in 2008.

This is one of their designs that I fell in love with in Las Vegas. The scalloped border and butterly are from a Nestability set that Spellbinders did for them. They have so many other die sets too so you'll be seeing more cards here on my blog from their stamps and dies. I have also discovered that Scrapbook Workshoppe in Blue Springs has also began to sell their stamps and dies.

I do love their stamps as they do a lot of bible verses and faith related designs.

Picture of Christmas Card 1 class cards from Stamper's Ink


As some of you know, I went out to Las Vegas for the Rubber Stamp and Scrapbook Expo. It was held in Las Vegas over the Halloween weekend. Las Vegas and the expo were a blast. I had so much fun. Came home with tired feet, but lots of wonderful stamps and card ideas.

Ever since I've been back to KC I've been making cards like crazy. I will be a vendor selling my cards at the St. Patrick Catholic school here in Kansas City, Kansas on Saturday, November 20th. I'll be reminding everyone about the craft show as we get closer.
This first picture is of six cards that I made at a class last week at Stamper's Ink. These were from the Christmas Card 1 class. Some of them were so simple that I know I'll make more for the craft show.